
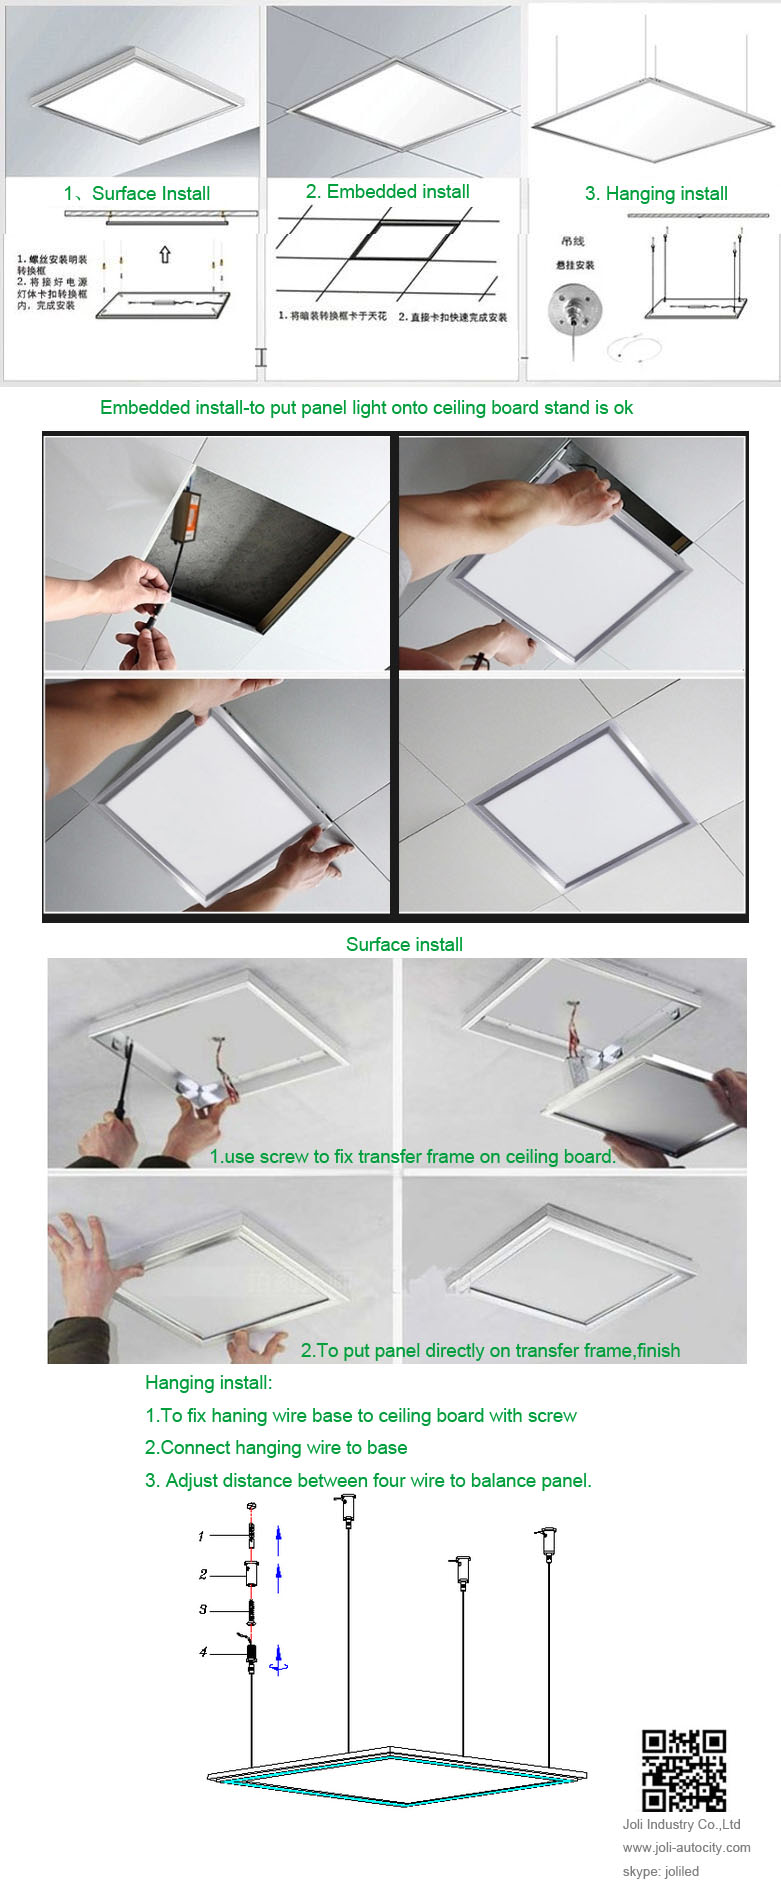
 Ceiling light
Name: Caesar
Tel: 0086 15876009829(24hrs)
Fax: 0086-15876009829
Mobile: 0086 18825335328
E-mail: joliledlights@163.com
E-mail: jolileds@163.com
Add: Building 10, Tongxing Road, Guzhen Town,Zhongshan City,Guangdong Province China.
QQ:
1181103490
QQ:
1931080060


1. How to get sample? Charge or free?
Finally, sample is free of charge. Hope you understand, lots of clients requested samples every day.
(Old clients have free samples gift time from time,to cooperate with us more than 3 years, your show room is full with our free sample lights)
2.Ship term: DHL/UPS/FEDEX/By Air/By boat or appointed by clients.
5.Warranty term: 3-5 year for all lights,During warranty time, we will replace new lights
for defective in next order shipment free.
6.Pack box: white or color netual box, mass order accept OEM order.
Stickers logo on every box is free, do OEM box will be charged. See example order PI as below:

Buyer: Seller:
.....................................................................................................................................................
How can we get updated pricelist?
1. send reuqest mail to joliled@163.com / joliledlight@163.com / joliledlights@163.com / joliledfactory@163.com / joliledexport@163.com
2. add skype:joliled
3. add whatsapp:+86 18825335328
4. add wechat: joliled
5. Follow us via linkedin: search joli
6. Follow us via facebook: https://www.facebook.com/profile.php?id=100010517437752&ref=bookmarks
常见规格 Container Size:
编辑|
规格
|
长×宽×高(米)
|
配货毛重(吨)
|
体积(m3)
|
|
20GP
|
内:5.898×2.352×2.385
外:6.058×2.438×2.591
|
17.5
|
33.1(正常装28方)
|
|
40GP
|
内:12.032×2.352×2.385
外:12.192×2.438×2.591
|
22
|
67.5(正常装56方)
|
|
40HQ(高柜)
|
内:12.032×2.352×2.69
外:12.192×2.438×2.896
|
76.2(正常装68方)
|
|
|
45HQ高柜)
|
内:13.556×2.352×2.698
外:13.716×2.438×2.896
|
29
|
86(正常装78方 )
|
|
20 OT(开顶柜)
|
内:5.898×2.352×2.342
外:6.058×2.438×2.591
|
20
|
32.5方
|
|
40 OT(开顶柜)
|
内:12.034×2.352×2.330
外:12.192×2.438×2.591
|
30.5
|
65.9方
|
How to choose lights for project?
send us picutre or dimension of places/tell us request , let us do light
solution for you.

What IS IES file?
IES light distribution test curve refers to a light source (or lamps) light intensity distribution in all directions of space.
Light distribution curve test methods:
Light distribution curve test general there are three ways: First, polar coordinate method, the second is rectangular coordinates method, three are equally light intensity curve.
IES generated files report contains the spatial intensity distribution curve, light distribution curve, luminous efficacy (lm / W), light intensity data area flux, lighting efficiency, utilization factor, curve, glare level, estimates curves, brightness limit, the maximum allowable distance than the effective beam angle, the radio flux, shot under flux, illuminance, etc. s curve, and other light intensity curve photometric parameters, as well as voltage, current, power, power factor and other electrical parameters.
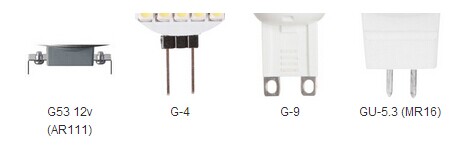
Do you have our country plugs?
Yes, see picture follow.
Make us note your special plugs when you put order.

Packing Lights And Corner of Warehouse Look.

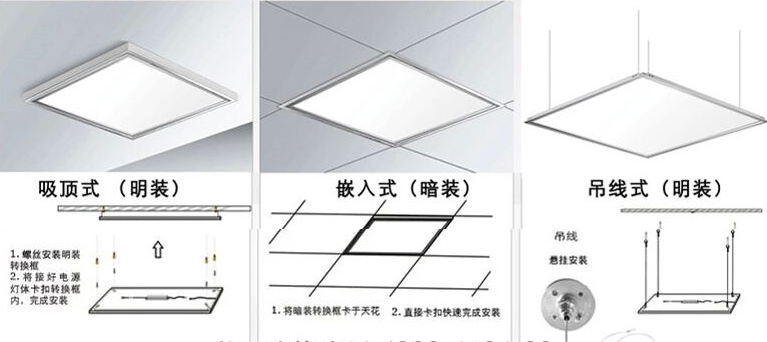
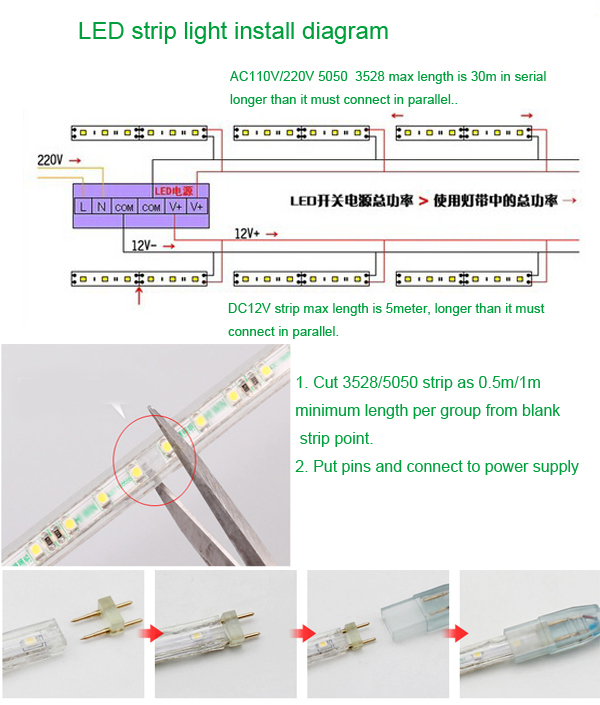
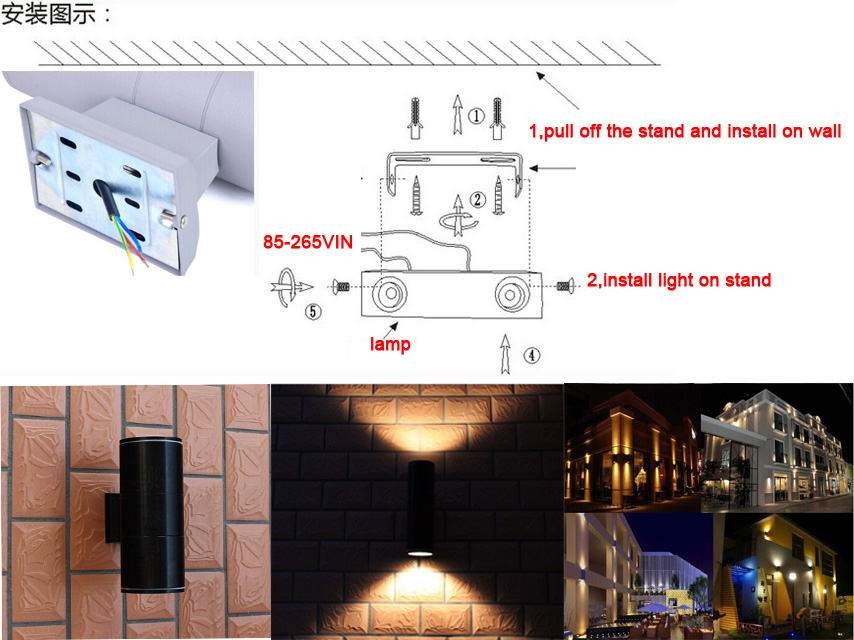
All Kinds of LED Lights Install Diagram:


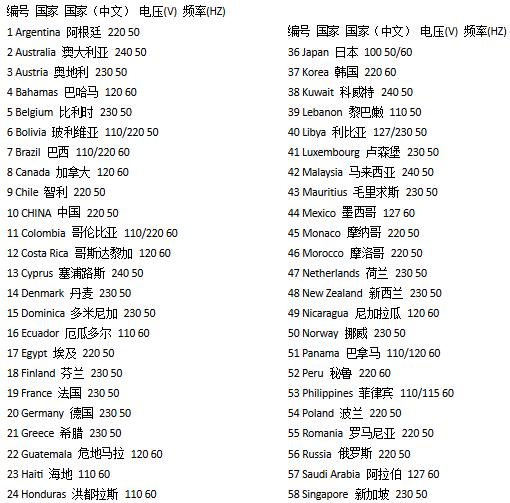
Worldwide Countries Voltage:

Contries Plug:
专业照明 illumination 防爆灯 explosion-proof lamp/light
室内灯 residential lamp 台灯 table /desk lamp/light
壁灯 wall lamp/light 落地灯 floor lamp/light
吸顶灯 ceiling lamp/light 镜前灯 mirror front lamp/light
户外灯 outdoor lamp 路灯 street lamp/light
庭院灯 garden lamp/light 草坪灯 lawn lamp/light
防水灯 waterproof /under water lamp 应急灯 emergency light
工具灯 utility light 浴室灯 bathroom light
灯饰附件 lighting accessories 灯饰配件 light fittings
灯泡 bulb 白炽灯泡 incandescent light bulbs
开关 switch 光源 light source
节能灯 energy saving lamp 荧光灯 fluorescent light/lamp
荧光灯管 linear fluorescent light tube 环形荧光灯fluorescent circular lamp
发光二级管LED 三极管 audion/dynatron
灯杯 lamp cup 灯罩 lamp shade/cover
灯头/灯座 lamp holder 灯头/灯座 lamp base
灯头型号 base’s type 灯盘 lamp house
灯盘 lamp plate/metal pan 灯柱 lamp pole
压克力配件acrylic fitting 塑胶配件 plastic fitting
五金配件 hardware fitting 玻璃配件 glass fitting
压铸件 die-casting fitting 电线 electric wire/power cored
插头 Pin/plug 插座 socket
螺丝 screw 螺母 nut
十字螺丝 philip’s head screw 扁头螺丝 flat head screw
方螺帽 square nut 螺栓杆 bolt bar
螺栓盖 bolt cover 金属面板 metal surface
面板 bezel panel 底板 back plane
镇流器 ballast 电子镇流器electronic ballast
感应镇流器inductive ballast 适配器 adapter
变压器 transformer 调节器 adjustment
连接器 connector 调光器 dimmer
接线端子 terminal 接线盒 connection box
电池 battery 光电池 photocell
备用电池 emergency battery 保险丝 fuse
调光器 dimmer 传感器 sensor
电线 electric wire 电镀 plating
抛光 finish/polish 铬 chrome
镍 nickel 铁 iron
钢 steel 铝 aluminum
银 silver 黄铜 brass
不锈钢 stainless steel 古铜色 antique brass
抛光铜色 polish brass 图纸 drawing
电路图 circuit diagram 玻璃备品 glass spare part
防水 waterproof 防尘 dustproof
落下测试 drop test 电器测试 electric test
老化测试 aging test 壁盘 back plate / disk
配件 component 绝缘 insulation
斑点 spots 刮痕 scratch
验货 inspection 对接 butt joint
对接焊接 butt weld 光色 light color
瓦特 watt 电压(伏特数)voltage
光强度 luminous intensity, 光强度单位:坎德拉 candela, cd
照度 Illuminance, 照度单位:勒克斯 Lux, lx
辉度 Luminance, 光通量 Luminous flux, ф
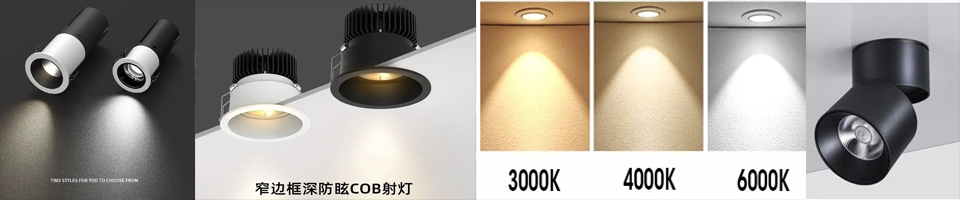
色温 color temperature 三基色 tri-phosphor
三基色稀土荧光粉 tri-phosphor Fluorescent Powder
三基色灯管 tri-phosphor tube light 三基色发光二极管 tri-phosphor LED

General Knowledge About LED Lights:
Normally, there are 7 kinds Traditional Lights applied in house.
For short: 7W LED lamp can replace traditional 50-60W lamp.
| Light Source | Luminoux effective | Light effective | Effective Luminoux |
| Incandescent lamp | 20LM / W | ||
| Fluorescent | 50LM / W | 70% | 35LM/W |
| Electrodeless lamp | 60LM / W | 60% | 36LM/W |
| energy-saving lamps | 60LM / W | 60% | 36LM/W |
| Metal Halide lamp | 80LM/W | 55% | 44LM/W |
| HPS- | 100-130LM/W | 55% | 55-72LM/W |
| LED lamp | 90-130LM/W | 95% | 85-123LM/W |
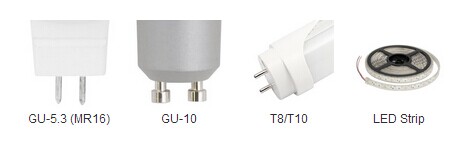
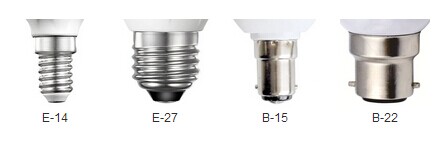
Bulb Base Category: (Normally,MR16 is 12V,While other base is 85-265V)


2 What is CRI?
.LED color rendering index is the color capability of comparation to objects lights.
3. What's Lumen?
Lumens luminous flux units. Luminous intensity of 1 candela (cd) of the point light source, the light flux emitted in a unit solid angle (1 steradian) is within "a lumen", the abbreviation (lm)
4. What's Power Factor?(PF)
Led power factor: refers to the LED in the application, useful effective data. Led power such as 0.95, indicating that the use efficiency of 95%, the LED drive current can be good 0.98 to 0.99 DC be possible. Take full advantage of 100% is impossible yet.
..........................................................
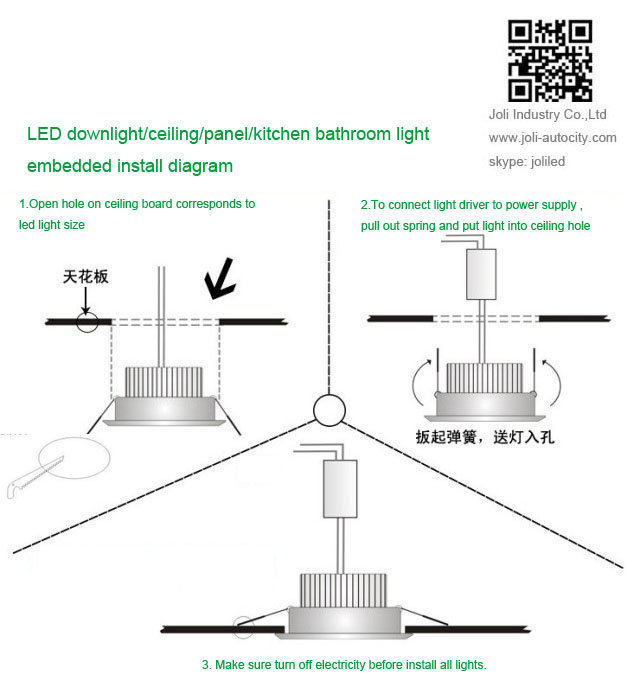
How to Install LED Downlight?
Question: How many Downlights do I want? Or need?
Answer
This very much comes down to personal preference. Personally I prefer to fit more than is required, and then divide then up onto different switches. This will create different lighting effects. For example if you are putting the downlights into a kitchen you could have the downlights that are placed over the worktops on one switch and the other downlights that are illuminating the rest of the kitchen on another switch possibly a dimmer. This then means that you have good task lighting where needed and controllable mood lighting elsewhere.
However there are still some important factors to remember.
Without having any technical information about your particular room, use the following "Rule of Thumb". This best describes a kitchen, but can be adjusted for any room in your house.
Firstly make sure the Downlights that are going to be closest to your walls are no more than 600 mm into the room. The reason for this is that 600 mm is the standard measurement for the depth of your floor cupboards. This will mean that once the Downlights are fitted, no shadows will be created over the area that you are working.
You should now work out the position of the other lights by spacing them at intervals of between 900 mm and 1200 mm. From these figures you should now be able to calculate how many fitting will be in a row and how many rows you will need.
Question: Should the Downlights be 12v or 230v?
Answer
This has been a long standing debate with no particular winner. I hope the below information helps.
Low voltage (LV or 12v) downlights are wired to a transformer, which is then wired to the mains supply. Although the transformer wastes approximately 10% of the power through stepping down the voltage to 12v this is more than compensated by the improved performance of low voltage downlights.
Due to a thicker filament, the halogen 12v bulbs (size MR16) are more efficient than the halogen 230v (size GU10) equivalent. The thicker filament also means that the bulbs are more robust.
Another advantage of 12v is that low voltage bulbs use halogen gas, which provides a much whiter and brighter light with higher clarity than the more traditional mains voltage incandescent bulbs.
Mains voltage downlights are wired directly to the mains without the need for a transformer.
The mains voltage (230v) downlights are generally cheaper, and can be simpler to install, as there is no need to install a transformer.
As an electrician I would advise my customers to use 12v Downlights in Kitchens and bathrooms where you generally need more light, but can be reduced using low wattage bulbs or dimmer switches if needed. The use of 230v Downlights in other areas would then be perfectly acceptable.
Question: Do the Downlights need to be fire rated, acoustic rated or IP Rated?
Answer
Ceilings provide an important barrier that helps to prevent the spread of fire and noise between the floors of a building. Installing recessed downlights punctures this barrier and can reduce the effectiveness of this safety barrier.
Installing fire rated downlights helps to protect your premises from the effects of both fire and noise pollution and aids compliance with new building regulations governing the installation of downlights. Made from intumescent materials, fire rated downlights seal the gap between the ceiling and the fitting to offer up to 90 minutes protection against the spread of fire into the void spaces within your ceiling / loft space.
Fire rated downlights are more expensive than non-fire rated downlights. However, the worst decision you can make is to buy cheaper models that look exactly the same only to find out from the electrician fitting them, that building regulations require fire rated downlights for that situation. Then fire hoods will have to be bought and you would now find that you have spent more money in the long run.
Personally I feel it is best to always go for the safest lights on the market. Fires cost lives, surely that is worth a few pence more to fit fire rated downlights.
Having the right IP rated downlights is also a very important factor. Please see "What is IP Zoning" to see whether you will need an IP rated downlight. Water and electricity do not mix. Again IP rated downlights cost a fraction more but by paying a little extra you could save yourself from being electrocuted, or causing the contacts in the fitting to corrode. This could lead to a short circuit and possibly a fire.
Question: Can I do the work myself or should I get an electrician in?
Answer
Firstly you should read " Part P - What is it? " as this will answer whether or not you can legally carry out the work you wish to do. Some people will always have a go, no matter what their level of competence is.
Electricity is dangerous and could kill you. I will always suggest to get an electrician in to do the work required, but if you are determined to do some electrics yourself please remember to be safe at all times and follow some basic safe isolation procedures before proceeding:
- Locate / positively identify correct isolation point or device
- Check condition of voltage indication device
- Confirm that voltage indication device is functioning correctly
- Switch off installation / circuit to be isolated
- Verify with voltage indicating device that no voltage is present
- Re-confirm that voltage indicating device functions correctly on known supply / proving unit
- Lock-off or otherwise secure device used to isolate installation / circuit
- Post warning notice(s)
Question: What is the best process from start to finish for actually fitting the Downlights?
Answer
- Decide where you wish to place your chosen downlights measuring out the ceiling and marking the central point of the light. Now drill a small pilot hole through the ceiling.
- Now you have marked out the positions of the downlights it is a good idea to check above the ceiling to ensure that there are no joists / wires / pipes in the way. You should be able to see a small pinprick of light coming through the ceiling where you drilled the pilot holes. If you are unable to view the ceiling from above it gets trickier. The best way is to determine which way the joists run and what the spacing of them are. You could then use an old wire coat hanger bent at a 900 angle to the width of the downlight. Insert the wire through the hole until the 900 bend is through. Now twist the wire a full 3600 and hopefully it will not bump into any obstructions.
- In the instructions or on the box of the downlights it will say what the cut-out for that downlight will be. For the best results I will generally use a hole saw (a type of drill bit) to the correct size of the downlight which can be purchased very cheaply from most DIY stores. Alternatively the use of a plasterboard saw (Pad Saw) can be used which eliminates the need for a drill and hole saw. For this method you will need to draw a circle on the ceiling to the correct size as a guide for when you start to saw.
- Hopefully now you have produced a clean cut hole in the ceiling, got the plaster out of your eyes and shaken yourself outside to stop you looking like Casper the ghost!
- Once the wiring has been pulled through the hole the downlight can be wired. To fit the downlight into the hole hold the two springs back against the sides of the downlighter and push up into the hole. The springs then lie flat on the top of the ceiling holding it in place
Question: Do I need any special tools?
Answer
This all depends on what you have in your tool box already! Please see the below list of what tools I have used in the past for fitting downlights. Some of them you might not need but can often prove useful.
- Chalk line
- Tape measure
- Pencil
- Pad saw
- Hand drill
- Hole saw (type of drill bit)
- Small drill bit for pilot hole
- Screw drivers
Question: Can the existing lighting circuit support the extra light fittings?
Answer
Lighting circuits are usually on 6 amp circuit breakers often know as MCB’s (Miniature Circuit Breakers). To calculate how many Amps are loaded onto the lighting circuit a simple calculation is made. UK voltage is 230 volts, now assume that each light on the circuit is 100 watts, and you have got 12 lights on the circuit.
The calculation would be:
Total Watts ÷ Voltage = Amps
So taking the above information the calculation would be:
1200 watts ÷ 230 volts = 5.22 amps
So now we can see that the above described lighting circuit is using 5.22 amps meaning that the circuit breaker of 6 amps is not being overloaded.
Now to confuse things a little but very helpful on lighting circuits when you are wishing to add more lights. On lighting circuits once you have worked out the amps you can now apply a thing called Diversity, which for lighting circuits is 66% of the total load. So to work out this calculation we can do the following sum:
5.22amps ÷ 100 × 66 = 3.45 amps
So now we can see that we are able to add more lights to the circuit now that diversity has been applied to it.
Remember to carry out your calculations before you start any work!
..............................................................................................................................
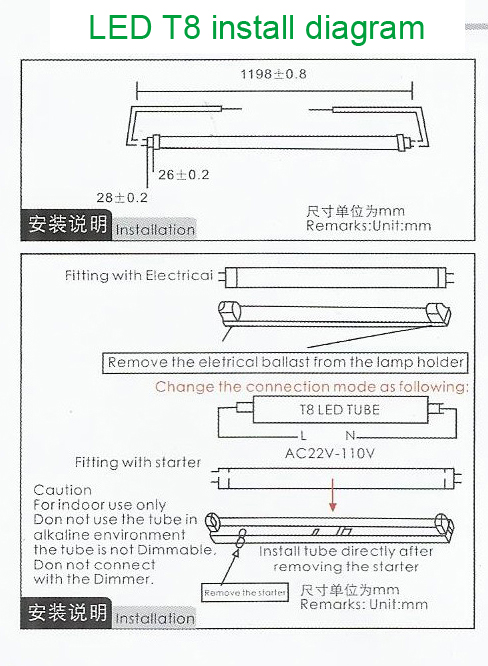
How to Install LED T8/T5 tube Light?
Step 1. Unpack the product:
- Unpack and carefully examine the product from top to bottom.
- Report any damage and save all packing materials, if any part was damaged during transport.
- Do not attempt to use this product, if it is damaged.
Step 2. Planning the installation:
- This device installation requires planning to ensure
- successful installation with minimal complications and down time.
Step 3. User responsibilities:
- It is the responsibility of the contractor, installer, purchaser,
- owner, and user to install, maintain, and operate the device in such a manner as to comply with
- all state and local laws, ordinances, and regulations.
Step 4. Product installation steps:
- Disconnect power to fixture at source. DO NOT SIMPLY SWITCH OFF FIXTURE
- Remove existing fluorescent tubes and safely set aside.
- Disconnect (cut) wires to ballast leaving enough wire to be tied off with wire nuts.
- Tie-off remaining wires attached to ballast with wire nuts.
- See wiring diagram shown on reverse for your type lamp fixture (i.e., 1-bulb, 2-bulb, 4-bulb and etc.) and re-wire fixture.
- Install Aladdin LED Retrofit Tube(s) into fixture.
- Affix included warning labels to fixtures near lamp connection/sockets of fixture so they are visible to bulb installers.
- Re-connect power supply and turn on switch. Tube will light.
Risk of fire or electric shock. Install the LED T8 T10 retrofit LED tubes only in luminaires that have the construction features and dimensions shown in the photographs and/or drawings shown on reverse of this sheet.
Ho
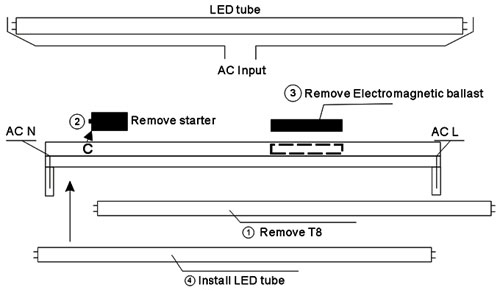
LED Light Tube T8 T10 Installation:
1/. Without Ballast and starter
- Directly connect the wires as shown in diagram I. join either A or B, or A & B together with the "Live" wire. join either C or D, or C & D together with the "Neutral" wire.
- Install the t8 LED tube on the bracket.

2/. With Electronic Ballast
- Take off the fluorescent tube.
- Cut the wire as shown on the dotted line of the diagram(2b).
- Bypass the ballast and remove the starter (if any) within the bracket.
- Reconnect the wires sa shown. join either A or B, or A & B together with the "Live" wire. join either C or D, or C & D together with the "Neutral" wire.
- Install the T8 LED Tube on the Bracket.
LED Tube Wiring Diagram for LED Retrofit To Fixture With Magnetic Ballast
Installing an LED tube light in an existing fluorescent fixture is relatively simple. If the fixture has an electronic ballast, you need to remove that and then wire the power directly to the end sockets. This is fairly simple, and typically you can use the existing wire in the fixture and then just add some wire nuts. If you have an older fixture with a magnetic ballast and starter, you will have to remove or open the starter and remove or short the magnetic ballast. Remember, of course, that when servicing a fluorescent fixture or lamp for any reason, electrical power to the entire fixture should be disconnected. This is not always practical in situations where a large number of fixtures are controlled from the same power control (such as in open office areas). In these cases, insulating gloves and a nonmetallic ladder should be used if the fixtures must be serviced when power is present.